Creating plugins
This page still on WIP (Work In Progress)
On this page you will learned how to create plugins.
Prerequesties
Good IDE - I'm recommended Intellij IDEA because all tutorials created on this IDE.
Java Development Kit 8 (JDK 8).
Java knowledge - because plugins use Java as main language.
and not be very lazy...
Preparing workspace
Firstly create project on Java named ExamplePlugin.

!!! Note
If you selected Project SDK is 1.7 or earlier change it to 1.8!
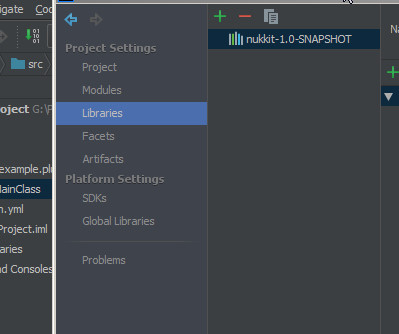
Open File/Project Structure.
Select Libraries. Tap add button and select Java.
Select your Nukkit's jar.
Result will be here
Begining
Create your package and create a class named MainClass.
Create a plugin.yml file on src dir and add to file this strings
#name, main, version and api are required
name: ExamplePlugin
main: com.example.plugin.MainClass
#remember version and api is string, don't write it like this: 1.0.0, or there will be an exception
version: "1.0.0"
api: ["1.0.0"]

load: POSTWORLD
author: Nukkit Project
description: Example plugin showing the API
Open MainClass and edit code to this
import cn.nukkit.plugin.PluginBase;
import cn.nukkit.utils.TextFormat;

public class MainClass extends PluginBase {

    @Override
    public void onLoad() {
        this.getLogger().info(TextFormat.WHITE + "I've been loaded!");
    }
    @Override
    public void onEnable() {
        this.getLogger().info(TextFormat.DARK_GREEN + "I've been enabled!");
    }
        @Override
    public void onDisable() {
        this.getLogger().info(TextFormat.DARK_RED + "I've been disabled!");
    }
This plugin will log three messages with colors. (First will be WHITE)
Commands
You learned how to log a your message on Nukkit. Now we learn how to create commands.
Firstly open class MainClass and add this code.
import cn.nukkit.command.Command;
import cn.nukkit.command.CommandSender;

    @Override
public boolean onCommand(CommandSender sender, Command command, String label, String[] args) {
    switch (command.getName()) {
        case "example":
            try {
                this.getLogger().info("Command sender is" + " " + sender.getName());
            } catch (IOException e) {
                throw new RuntimeException(e);
            }
            break;
    }
    return true;
}
After open your plugin.yml and add this code.
commands:
  example:
    description: Example command
    usage: "/example"
    permission: exampleplugin.command.example
permissions:
  exampleplugin.command.example:
    description: "Allows the user to run the example command"
    default: true
Now you know how to use commands in your plugin.
Debugging
This section works only on IntelliJ IDEA
Now we learn how to debug your plugin.
Firstly open File/Project Structure and select artifacts. Tap add and select Empty JAR. Close Project Structure menu and select Build/Build Artifacts. Select your Empty JAR.
Now your plugin jar is on directory out/libs or target/libs
Move it to plugins directory on your Nukkit server and run nukkit.
That's all tutorial to debug a plugin.
Event Listening.
Now we learn how to listen events
Create class named EventListener. Add this code below.
import cn.nukkit.event.EventHandler;
import cn.nukkit.event.EventPriority;
import cn.nukkit.event.Listener;
import cn.nukkit.event.server.ServerCommandEvent;

/**
 * author: MagicDroidX
 * NukkitExamplePlugin Project
 */
public class EventListener implements Listener {
    MainClass plugin;

    public EventListener(MainClass plugin) {
        this.plugin = plugin;
    }

    @EventHandler(priority = EventPriority.NORMAL, ignoreCancelled = false) //DON'T FORGET THE ANNOTATION @EventHandler
    public void onServerCommand(ServerCommandEvent event) {
        this.plugin.getLogger().info("ServerCommandEvent is called!");
        //you can do more here!
    }
}
This listener be launched on any Server Command. To add your listener see Javadoc API.